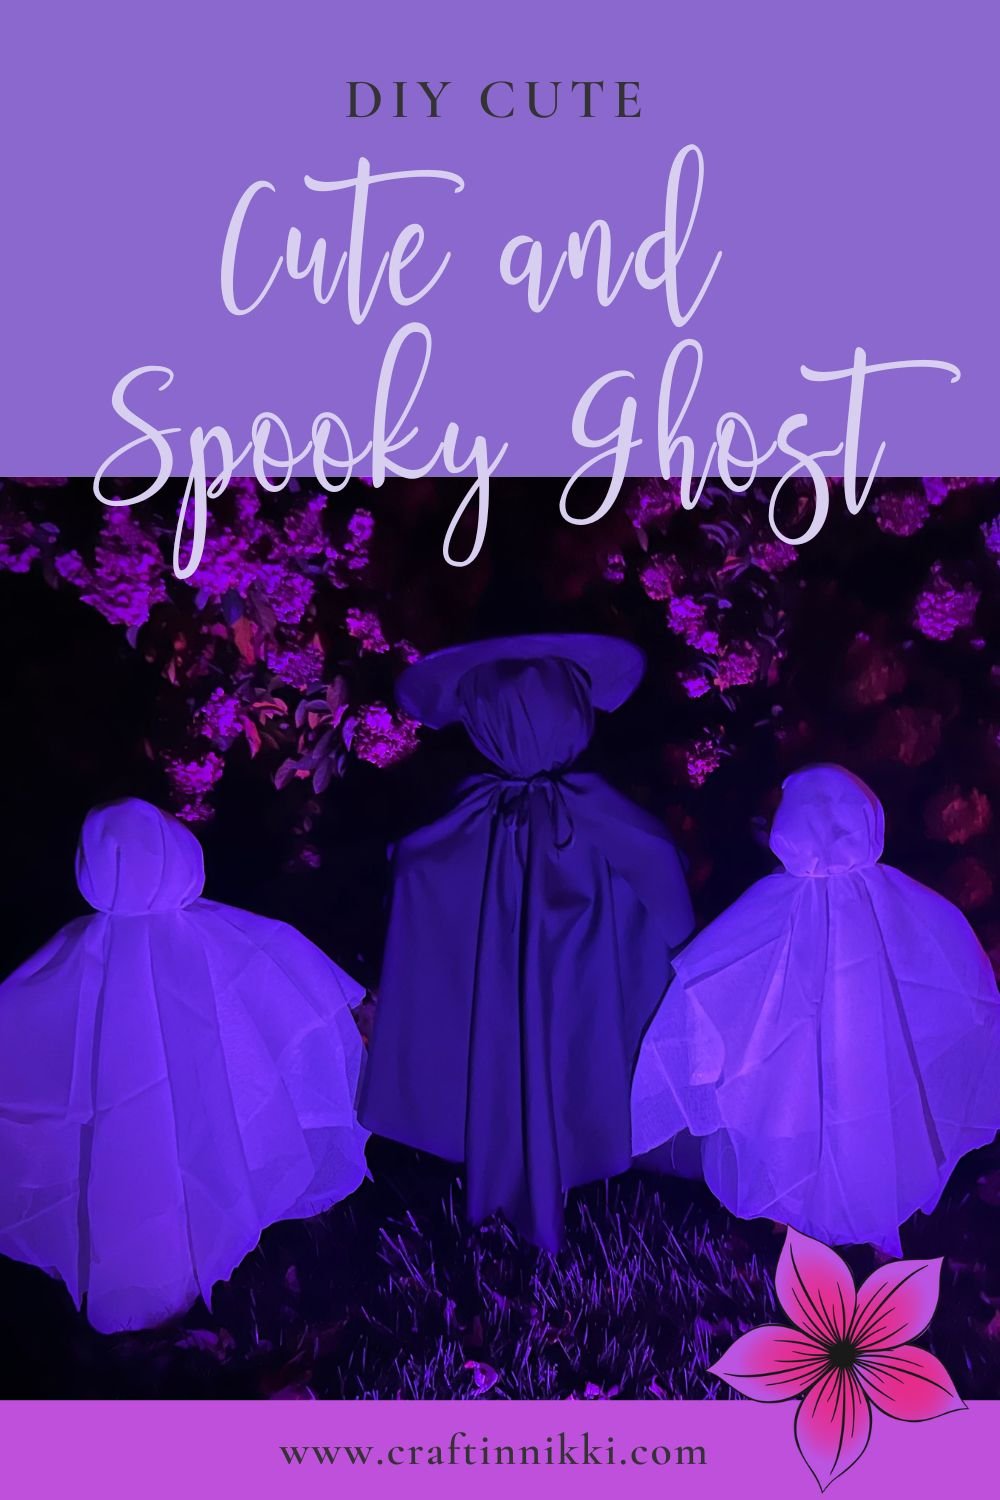
DIY Cute Spooky Ghost Decoration
Are you like me when it comes to Halloween prepping and decorating? You travel far and wide to locate the best and the cutest of the Halloween decorations, but you don’t always find what you are looking for? But then the light bulb goes bright green and purple and you get the ultimate idea! You decide to just make your own after scowering the internet for ideas on how to get started (ie Pinterest, YouTube, etc)! This is me, every day, all day. Crafters are always gonna be craftin’, so guess what a Craftin’ Nikki does…she makes her own and the world is a much better place for it.
This year for me, personally, has been a little bit different, but in a great way. I moved into my house last year and did decorate for Halloween, but just not exactly how I wanted. I am such a designer and planner when it comes to decorations, lighting, spacing, and all the tiniest of details. This year, I have fine tuned my decorations to fill in the missing pieces that I knew will complete the look I am going for.
Let’s find out how easy it is for you to make you own decorations this year and how to just have fun with it!
Inspired by our Favorite Characters
What are some of the most nostaglic Halloween characters that you can think of when you think of your childhood? I immediately think of Casper and the Sanderson sister witches. I am obsessed with all the nastaligic 90’s scary movies (being a xennial and all), which include the coolest of the spooky but cute characters we all love. Beetlejuice, Jack Skellington, and Morticia Addams are a few more that will always hold a special place in my heart every season. All of these characters are my inspiration for my cute spooky ghost and witch idea!
Daytime and Nighttime is the Perfect Time
I have been playing around with the lighting of my decorations for some time now and find that these DIY ghosts look great in the light and in the dark. If you decide to add faces onto the front of the ghosts, they really do pop in the sunlight and look as if they are watching you. And after the sun goes down, the colored spotlights attract the creeping shadows behind the bottoms of your new little friends. I am so in love with how versatile they can be for any decoration style. And as an added bonus, since this design is on a wooden dowel, you can place it anywhere in the ground! No, are you ready to make one of your own?
Let’s Get Started!
I will tell you that when I was planning out how to make these cutie pies, I sort of grabbed some materials that I already had and planned out what would be easily accessible for anyone else to be able to purchase. There is not one item on the supply list that you cannot get from a Dollar Store, Target, Walmart, or any craft supply store.
There are a couple ways to learn how to make your own spooky ghost. Here is a short video tutorial below, or you can find the written instructions supply list as you keep scrolling. And remember, always have fun crafting!!
Supplies Needed
This supply list is per each ghost or spider:
(1) Sheer curtain panel
(1) 1/2" Wood Dowel
(1) Roll of white duct tape
(1) Metal swivel hanger
(2) White trash bags
White string
Handful of grocery bags (perferably white)
Pair of scissors
Black marker
Shop Craftin Nikki for your favorite tulle hair bows and accessories.


Step 1 - Begin with the head
Using your (perferrably white) grocery bags, stuff about 5 to 6 of them into your first white garbage bag. Keep squeezing out any air pockets as you continue to shape the ball into a circle/triangle. Cut about 3 pieces of white duct tape and place them in a criss-cross pattern on one side of the bags. This will start to take shape and keep it shape for years to come.
Step 2 - Shoulder shaping
Poke a hole in the bottom of the head large enough to squeeze in the metal hook of the swivel hanger. Then poke one end of the wooden dowel through the same hole, but no too far to surpass the top of the metal hook. Cut a few more pieces of white duct tape and place it to secure the dowel to the hanger and the head to the hanger.
Step 3 - First layer of ghosting
Grab the second white trash bag and cut the drawstring off the bottom. Then, from the bottom opening, grab your head and shoulders( that you created from the previous steps,) qnd feed them through. Do your best to evenly space the shoulders in the middle of the top of the garbage bag.
Step 4 - OPTIONAL - Extra bottom layering
If you have an extra 30”x30” piece of dark fabric, tatter one edge of it and hot glue the opposite edge to long edges of the swivel hanger, while draping and contouring the corners to the top.
Step 5 - OPTIONAL - Add a face
Using a black marker, draw two eyes and a mouth. This does not have to be perfectly drawn and I only suggest adding the features to give the ghost face some depth once the other layers are added.
Step 6 - Top finishing layers
Cut your sheer curtain panel into two pieces (they do not need to be the exact same size, but close). Drape one square over the head and shoulders of the ghost. Drape the second square, in an opposite direction, over the head and shoulders. Using a strong white string/rope, wrap around the base of the neck to the secure and shape the head. Move the fabric around the head, while keeping the string secure, to manuver to the face can be seen.
You now have a cute spooky ghost on a stake that you can place anywhere in your yard! It looks so fun and the possibilities are endless. Make as many as you would like and be sure to save them for next year!
Pin your favorite Craftin With Nikki Blog Post!