One Easy Way to Make a Fairy Garden
Are you that person that always has to visit the hobby aisle where the miniture fairies and furniture are? Then you are just like me! I always take a peek to see if any are on sale and to also get a little motivation to make one myself. I will break the fairy magic down to not overwhelm you creativity but to just give you a little guidence on where to buy supplies and where to start. If this sounds like fun, keep reading!
Research Without Researching
I know you are saying to yourself that Craftin Nikki must be a little crazy, but I swear I am not! If you are like me (which it seems like you are), you probably scroll through Pinterest, saving every fairy grden photo that resembles that fairy
There are so many ideas floating around on Pinterest and Google that it can sort of make your head spin a little. I would love to share with you what I have created this year but only take them with a grain of sand. 😊
Let’s Get Started!
After you have been shopping for your favorite plants and accessories, just start and dive right in with the dirt. you may get a little dirty along the way but it’s totally worth it in the end. I promise.
Supplies Needed:
(1) Large Watermelon
(1) Large Knife
Strong toothpicks
Mellon baller (or large spoon)
Assorted fruits and berries
Extra large mixing bowl
Strong platter base
Metal skewer
Plastic Wrap
Serving Spoon
I hop you have enjoyed watching and learning with me! Now it’s time to try making your own watermelon art. You can do it!


Step 1 - Prep your work space
I would suggest having ample space to work with due to the size of the watermelon and how many pieces it gets cut into.
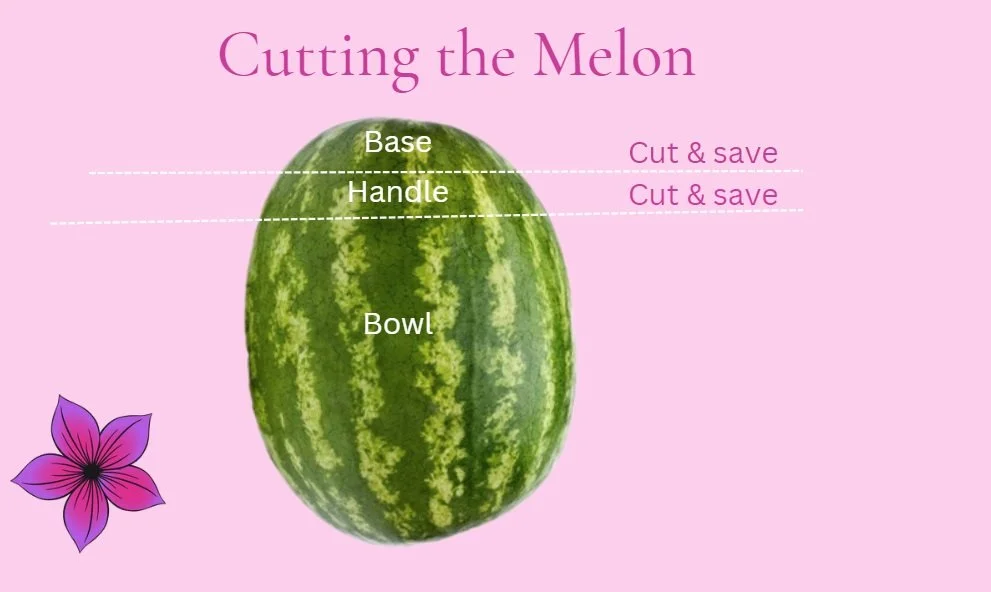
Step 2 - Cut the melon into four sections
Using your cutting board and large knife, slice the melon into four sections as shown in the photo. Due to the different shapes and sizes of the melons, there will not exact measurements needed but use this as a guide. The second base/bottom of the melon should be saved as an optional lid.
Step 3 - Remove the inside of the melon
Using a melon baller or a large spoon, scoop out the melon into a separate extra large mixing bowl. You will be using that melon to mix with the other fruits before placing it back into the shell (teacup) in later steps.
Step 4 - Assemble the teacup
Place the Base piece, melon side down, onto your platter then push in (at least) four toothpicks into the top center. Carefully place the Bowl (bottom side down) into the toothpicks at an angle. Try to distribute the weight of the bowl so it does not tip to the side. (The next step will allow for counter weight once the handle is attached.) Add extra toothpicks as needed.
Step 5 - Attach the handle
Trim the Handle piece as needed to make the perfect side loop and attach it to the side of the bowl, opposite of the angled outward side, using at least two toothpicks. This will help distribute the weight and help the teacup take shape.
Step 6 - Fill the teacup with fruit
In your large mixing bowl, add your other fruits and berries and stir well. Spoon the mix into the large bowl of the teacup. If you have extra fruit left over, get creative and place it around the edge of the base of the bowl and grab a long skewer to make fruit kabobs. Or, just grab an extra bowl and spoon and bring the rest to the party to refill the teacup with later.
Step 7 - Optional: Wrap the teacup in plastic wrap
If you will not be serving the fruit right away, I would recommend wrapping the teacup in plastic wrap and placing it into the refrigerator to stay chill over night. Your fruit should still keep until the next day and your fruit creation will be the hit of the party!
You now have a watermelon teacup dessert to bring to the party! It’s one of the most creative ways to change up the typical “fruit bowl” into a work of art.
Pin your favorite Craftin With Nikki Blog Post!