Easy DIY Watermelon Teacup Dessert
If you are anything like me, your friends know by now that you really enjoy making food art. I usually get nominated to make a special creation for summer parties and holiday gatherings every year. On this particular occasion, my best friend Stephanie requested that I bring some fruit for her daughter’s first birthday party. Well, Craftin Nikki does not just bring fruit to the party…she brings a giant teacup full of the best berries, kiwis, and seedless watermelon that she can find! Keep reading to see how easy it is to make your own and to find out what materials you’ll need.
Inspired by One of Our Favorite Children’s Stories
Have you ever read or watched Alice in Wonderland by Lewis Carroll? Who hasn’t at least heard of the story? Alice’s adventures take place in a magical wonderland where cats talk, queens have flamingo sticks, and furniture dealers invite you to tea. This teacup is based on the inspiration from the eccentric tea party in the gardens. Let’s see how we can make this magical tea party come to life with a giant teacup!
Storage and Serving Ideas
I had made this dessert the day before the party because I knew I would not have time the morning of. I would recommend making room in your refrigerator to store this sweet treat overnight. Some fruits and berries are perfectly fine to leave out but most are not, especially after they have been sliced and diced. But wrapping the entire melon in plastic wrap is a great way to seal in the freshness of the fruit until it is served the following day.
Also, consider where you will be serving the dessert. Using a very sturdy base or platter underneath the base of the teacup is very important. If there is any chance that your base is not strong enough, you may end up with a broken watermelon serving bowl for the park critters later on.
Let’s Get Started!
The most difficult part of this food art is deciding which fruit and berries combination you will choose. But once you have decided, prep your work space with a large cutting board, have a large knife big enough to slice your watermelon, and, last but not least, find the best watermelon you can find!
There are a couple ways to learn how to make your own watermelon teacup. Here is a short video tutorial below, or you can find the written instructions and supply list as you keep scrolling. And remember, always have fun crafting!!
Supplies Needed:
(1) Large Watermelon
(1) Large Knife
Strong toothpicks
Mellon baller (or large spoon)
Assorted fruits and berries
Extra large mixing bowl
Strong platter base
Metal skewer
Plastic Wrap
Serving Spoon


Step 1 - Prep your work space
I would suggest having ample space to work with due to the size of the watermelon and how many pieces it gets cut into.
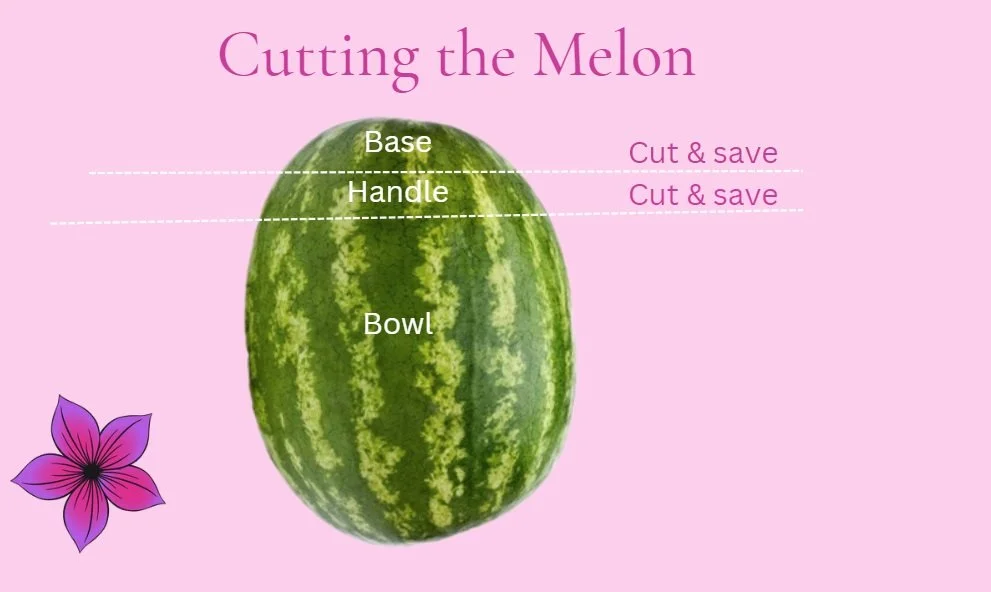
Step 2 - Cut the melon into four sections
Using your cutting board and large knife, slice the melon into four sections as shown in the photo. Due to the different shapes and sizes of the melons, there will not exact measurements needed but use this as a guide. The second base/bottom of the melon should be saved as an optional lid.
Step 3 - Remove the inside of the melon
Using a melon baller or a large spoon, scoop out the melon into a separate extra large mixing bowl. You will be using that melon to mix with the other fruits before placing it back into the shell (teacup) in later steps.
Step 4 - Assemble the teacup
Place the Base piece, melon side down, onto your platter then push in (at least) four toothpicks into the top center. Carefully place the Bowl (bottom side down) into the toothpicks at an angle. Try to distribute the weight of the bowl so it does not tip to the side. (The next step will allow for counter weight once the handle is attached.) Add extra toothpicks as needed.
Step 5 - Attach the handle
Trim the Handle piece as needed to make the perfect side loop and attach it to the side of the bowl, opposite of the angled outward side, using at least two toothpicks. This will help distribute the weight and help the teacup take shape.
Step 6 - Fill the teacup with fruit
In your large mixing bowl, add your other fruits and berries and stir well. Spoon the mix into the large bowl of the teacup. If you have extra fruit left over, get creative and place it around the edge of the base of the bowl and grab a long skewer to make fruit kabobs. Or, just grab an extra bowl and spoon and bring the rest to the party to refill the teacup with later.
Step 7 - Optional: Wrap the teacup in plastic wrap
If you will not be serving the fruit right away, I would recommend wrapping the teacup in plastic wrap and placing it into the refrigerator to stay chill over night. Your fruit should still keep until the next day and your fruit creation will be the hit of the party!
You now have a watermelon teacup dessert to bring to the party! It’s one of the most creative ways to change up the typical “fruit bowl” into a work of art.
Pin your favorite Craftin With Nikki Blog Post!